

Learn how to back up photos and videos on Android before changing phones and verify that your memories are safely stored before deleting anything.
Changing your Android phone is exciting, but transferring your photos is one of the things that should be handled carefully. Your camera roll may contain years of family photos, videos, screenshots, documents, and other files that cannot easily be replaced.
The safest approach is to confirm that your important photos and videos are backed up before you erase, trade in, sell, or stop using your old phone.
Google Photos can automatically back up photos and videos to your Google Account, while Android’s device backup can save other types of information such as apps, app data, contacts, device settings, and SMS messages. These are separate backup functions, so it is worth checking both when preparing to change phones.
This guide explains how to back up your photos, verify the backup, and avoid one of the most frustrating problems that can happen when moving to a new Android phone: discovering later that some photos were never uploaded.
Practical example: The screenshots in this guide will be captured on a Samsung Galaxy. The exact names and locations of menus may differ depending on the Android version and device manufacturer.
Why You Should Back Up Photos Before Changing Phones
Your photos may exist in several different places on your current phone.
Some might have been taken with the camera, while others may have come from messaging apps, downloaded folders, screenshots, or social media.
Because of this, simply assuming that “everything will transfer” is not a reliable backup strategy.
Android provides tools for backing up data and transferring information to a new device, but Google notes that the exact restoration process varies by device and Android version.
A separate photo backup gives you another layer of protection.
The important objective is simple:
Do not erase the old phone until you have confirmed that your important photos are available somewhere else.
Step 1: Open Google Photos
Start by opening the Google Photos app on your Android phone.
Make sure you are signed in to the Google Account that you intend to use for your photo backup.
In Google Photos, tap your profile picture or account initial in the upper-right corner.
Then open the Photos settings and look for Backup.
Google’s current instructions use this general path to check photo backup:
Google Photos → profile picture → Photos settings → Backup.
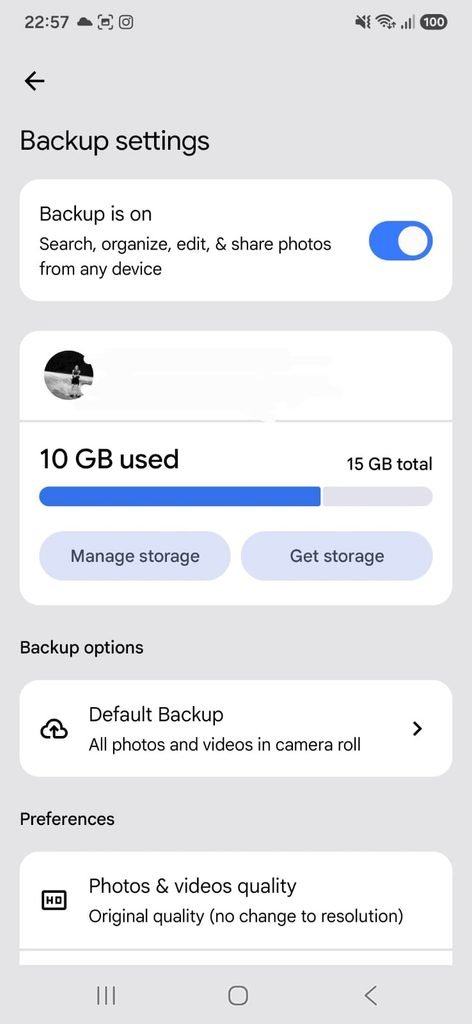
Google Photos backup settings showing the account and backup status on an Android phone.
Step 2: Check Whether Backup Is Enabled
Inside the backup settings, check whether Backup is enabled.
This setting determines whether Google Photos can automatically upload photos and videos from your phone to your Google Account.
If backup is disabled and you want to protect your photos in Google Photos, enable it and allow the process to begin.
Do not immediately assume that every photo on the phone has already been uploaded.
Turning backup on starts the process, but the upload may still be in progress.
Step 3: Check Which Google Account Is Being Used
Before relying on the backup, verify which Google Account is connected to Google Photos.
This matters when a phone has more than one Google Account.
A photo backed up to one account will not automatically appear in another account simply because both accounts are present on the device.
Look at the account information shown in the Google Photos backup settings and make sure it is the account you expect to use on your new phone.
This is one of the simplest checks you can perform before changing devices.
Step 4: Wait for the Backup to Finish
Depending on how many photos and videos are stored on your phone, the backup can take time.
Google’s Android guidance notes that some backup processes can take up to 24 hours to complete.
A large photo library may also require significant internet bandwidth.
For that reason, it is better to begin the backup well before the day you plan to replace your phone.
Avoid making the backup at the last minute.
Step 5: Verify That Your Photos Are Actually Available in Google Photos
This is one of the most important steps in the entire process.
Do not rely solely on the fact that the backup switch is turned on.
Open Google Photos and check older photos, recent photos, and a few videos.
Try to find files from different periods.
For example, check:
- An older photograph
- A recent photograph
- A video
- A screenshot
- A photo from a different folder, if applicable
The purpose is to confirm that the files you care about are actually available in your Google Photos library.
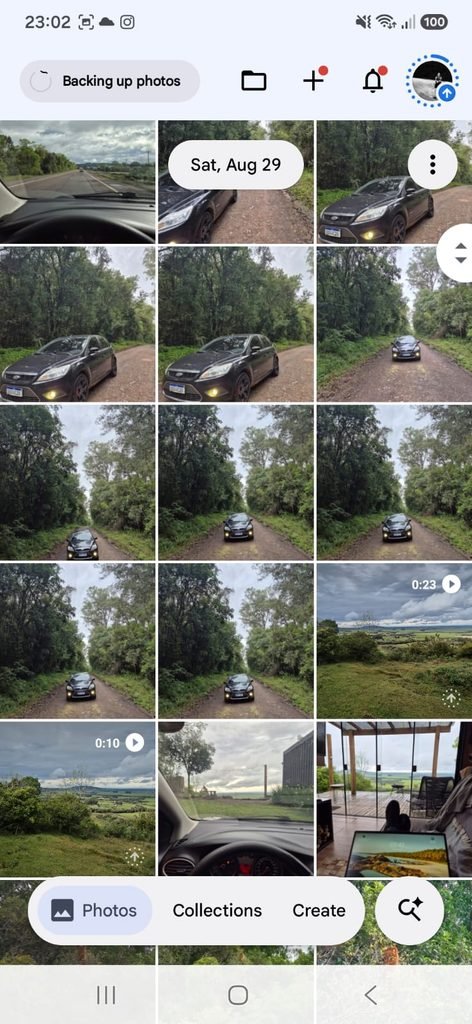
Google Photos showing backed-up photos available in the user’s photo library.
If an important photo is present in your Google Photos library and accessible from the account you intend to use on the new phone, that provides a much stronger indication that the photo has been backed up successfully.
Step 6: Check Your Backup Details
Android also allows you to review broader device backup information.
Open:
Settings → Google → All services → Backup
The exact menu may differ depending on the device and Android version.
Google’s current Android instructions state that this area can show which types of data are included in the device backup.
Device backup may include information such as:
- Apps and app data
- Call history
- Contacts
- Device settings
- SMS and MMS messages
Photos and videos are handled through Google Photos when you use the service for photo backup.
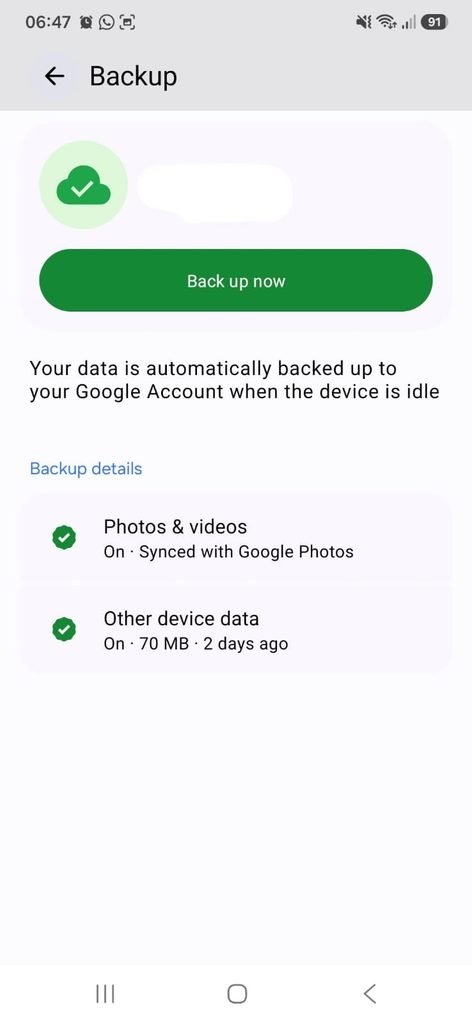
Android backup settings showing the device data included in the Google backup.
This distinction is important because a Google device backup and Google Photos backup are not exactly the same thing.
Step 7: Manually Back Up Important Files Too
Cloud backup is useful, but especially important files can benefit from an additional copy.
For example, you may have:
- Family videos
- Important documents
- Old photos
- Work files
- Scanned records
You can transfer files from an Android phone to a Windows computer with a USB cable.
Google’s current instructions explain that you can connect an unlocked Android device to a computer, choose File Transfer under the USB options, and then copy files between the devices.
This creates an additional copy outside your phone.
For especially valuable files, having more than one backup location is a sensible precaution.
Step 8: Check Photos From Other Folders
Your main camera folder is not necessarily the only place where important images are stored.
Look through folders containing:
- Screenshots
- Downloads
- Images received through messaging apps
- Edited photos
- Documents saved as images
Some applications handle their own media differently, so it is worth checking whether the content you care about is included in your normal photo backup.
Do not assume that every image on the phone is automatically included simply because Google Photos is installed.
Step 9: Prepare the New Android Phone
Once your backup is complete, you can begin setting up the new phone.
Google explains that Android can transfer apps and certain data during the setup process. You can use a cable or a wireless method, depending on the devices and setup options provided.
For a transfer between Android phones, Google recommends backing up the old device first and connecting the devices to Wi-Fi.
During setup, the new phone may ask whether you want to copy apps and data from another device.
Follow the instructions shown on the screen.
Step 10: Sign In to the Same Google Account
When setting up the new phone, sign in to the Google Account where your photo backup is stored.
Once Google Photos is opened and synchronized, your backed-up photos should be available through that account.
Google explains that photos and videos backed up to Google Photos are already available through the service, while other backed-up device data can be restored during the new-device setup process.
Step 11: Compare the Old and New Phones Before Erasing Anything
This is the final safety check.
Before resetting, trading in, selling, or giving away your old phone, compare the two devices.
Check:
Recent photos
Older photos
Videos
Important albums
Screenshots or other important images
If something is missing, stop the process and investigate before erasing the old device.
This extra check can prevent a backup problem from becoming permanent.
Why You Should Not Factory Reset the Old Phone Too Early
A factory reset removes the information stored on the device.
That makes it particularly important to complete your backup and transfer first.
Google’s Android documentation specifically places backup and transfer steps before resetting a phone when preparing to restore or start over.
Never treat a successful device-to-device transfer as proof that every individual photo has been preserved.
Check the files that matter most.
What About WhatsApp Photos?
WhatsApp handles its own backup process, so you should not assume that the Android device backup alone covers everything you need from your WhatsApp conversations.
Google’s Android documentation notes that WhatsApp conversations and data can be restored from the app’s cloud backup when the appropriate backup has been enabled on the old device.
Before changing phones, open WhatsApp and check its own backup settings if your conversations or media are important to you.
What If Some Photos Are Missing From Google Photos?
Do not erase the old phone.
First investigate where the missing photos are stored.
Check the device’s folders and look for content from:
- Camera
- Downloads
- Screenshots
- Messaging apps
- Editing applications
You can also manually copy important files to a computer using USB.
The important thing is to locate the original file before removing it from the old device.
Can You Delete Photos From the Old Phone After Backing Them Up?
You can remove local copies when you have verified that the photos are safely backed up and you understand how you will access them on the new device.
Google Photos provides tools for managing backed-up content, including options designed to free local storage after photos have been safely backed up.
However, do not use a storage-cleanup feature as your first verification step.
First confirm that the photos you care about are actually available in the cloud.
What Happens If the New Phone Has Less Storage?
A new phone with less internal storage may not be able to hold exactly the same collection of locally stored files.
Google recommends checking the available storage on both devices before transferring data. If the new device does not have enough space, you can choose which data to transfer.
This is another reason cloud-backed photos can be useful.
You do not necessarily have to keep every backed-up photo stored locally on the new phone.
What If the New Phone Uses an Older Android Version?
Android version compatibility can affect restoration.
Google notes that a backup from a newer Android version cannot necessarily be restored onto a device running an older version, and using different Android versions can lead to an incomplete transfer in some situations.
Before changing phones, check the Android versions on both devices.
When possible, update the devices before beginning a major transfer.
A Simple Pre-Switch Checklist
Before leaving your old phone behind, confirm:
Google Photos backup is enabled.
The correct Google Account is being used.
Recent photos are visible in Google Photos.
Older important photos are visible.
Important videos are available.
Important documents have another copy.
WhatsApp has been backed up if necessary.
The new phone has enough storage.
You have checked the new phone before resetting the old one.
This takes a little time, but it is much safer than discovering missing files after the old phone has already been erased.
Frequently Asked Questions
Does Android automatically back up my photos?
Android’s general device backup and Google Photos photo backup are separate features. Photos and videos can be automatically backed up through Google Photos when its backup feature is enabled.
How do I know if my photos are backed up?
Open Google Photos and check the backup status associated with your Google Account. Then verify that older and recent photos are available in the library.
Do I need Google One to back up Android?
Android can back up supported data to your Google Account. The amount of cloud storage available depends on your Google Account and the services you use. The Android backup system includes supported device data, while Google Photos handles photo and video backups.
Will my photos appear automatically on my new Android phone?
Photos backed up to Google Photos are available through that service when you sign in to the same Google Account. Other types of device data are restored separately through the Android backup and transfer process.
Should I keep my old phone after transferring my data?
Yes. Keep it until you have checked the new phone and confirmed that your important files, photos, videos, messages, and other required information are available.
Can I transfer Android files directly to a computer?
Yes. Google documents USB file transfer between Android devices and Windows computers. You typically need to unlock the phone, connect it with a USB cable, and select File Transfer in the USB options.
Take a Few Minutes Before You Erase the Old Phone
Changing phones does not have to mean risking your photo collection.
The safest process is straightforward: back up first, verify the backup, transfer your data, check the new device, and only then erase the old phone.
Google provides several tools to help with this process, including Google Photos for photos and videos, Android’s device backup for supported device data, and direct transfer options when setting up a new Android device.
The extra verification step is what matters most.
A backup setting being enabled is not enough by itself. Open your backed-up library and confirm that the photos and videos you cannot afford to lose are actually there.
That few-minute check can make the difference between a smooth phone upgrade and permanently losing important memories.