

Learn how to free up storage on an Android phone safely. Find large files, duplicate files, unused apps, downloads, and temporary data without deleting important files.
Practical example: The screenshots in this guide were captured on a Samsung Galaxy. Android settings can look different depending on the manufacturer, model, and Android version.
Running out of storage on an Android phone can become a problem before you realize what is taking up the space. Photos, videos, downloads, duplicate files, apps, and temporary data can accumulate over time.
The safest way to clean up storage is not to start deleting files at random. Instead, first identify which categories are using the most space and then review the largest items individually.
Android provides built-in storage management tools for this purpose. Google also recommends checking storage usage, removing unnecessary downloads, uninstalling apps that are no longer used, clearing cache when appropriate, and moving files to another device when necessary.
In this guide, I will show you how to go through those areas step by step, using real screenshots from a Samsung Galaxy as examples.
Before You Start
Before deleting anything, identify the files that you definitely want to keep.
These might include:
- Important photos and videos
- Work documents
- Scanned documents
- Personal records
- Files that exist only on your phone
- Photos that have not been backed up
There is an important difference between freeing storage and simply deleting as much as possible. The goal is to recover space without accidentally losing something important.
Also keep in mind that Android menus differ between manufacturers. A Samsung Galaxy may use different labels or menu locations from a Google Pixel, Motorola, Xiaomi, or another Android device.
Step 1: Check How Much Storage Your Phone Is Using
Start by looking at the phone’s storage overview.
On many Android devices, you can find it by opening:
Settings → Storage
On Samsung phones, the wording and layout may differ slightly depending on the One UI version.
The storage screen gives you an overview of how much internal storage is being used and which categories are responsible.
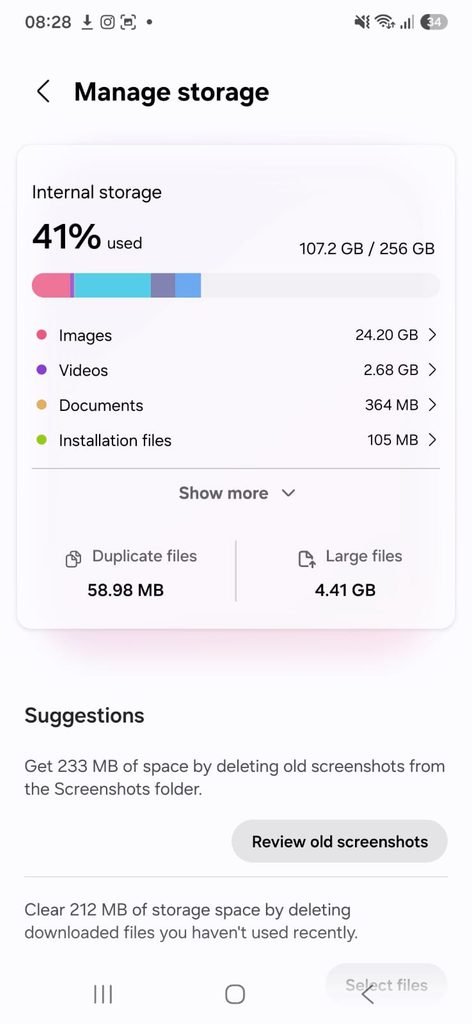
Image 1 caption:
Samsung Galaxy storage management screen showing 41% of the 256 GB internal storage in use.
Suggested image alt text:Samsung Galaxy storage management screen showing storage usage and file categories
In the example above, the phone has 256 GB of internal storage, with 106.7 GB in use, representing 41% of the available capacity.
The largest visible category is Images, using 24.20 GB. Videos account for another 2.68 GB, while the phone also identifies 4.41 GB of large files and 58.98 MB of duplicate files.
This gives us an important clue: there is no reason to begin deleting random small files when the storage screen has already identified much larger categories.
Google recommends checking storage usage and selecting individual categories before deciding what to remove.
Step 2: Look for Large Files First
Large files can be one of the fastest ways to identify where storage is being consumed.
On the Samsung example shown above, the storage manager reports 4.41 GB of large files.
Tap Large files to inspect them.
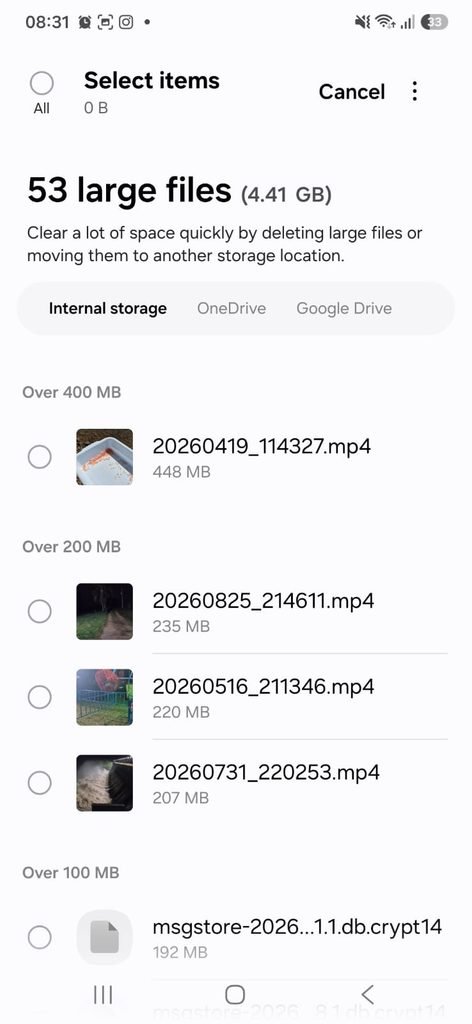
Image 2 caption:
Samsung Galaxy storage manager identifying 53 large files occupying 4.41 GB of internal storage.
Suggested image alt text:Samsung Galaxy list of large files showing videos and their file sizes
In this example, the phone found 53 large files totaling 4.41 GB.
The largest visible file is a 448 MB video, followed by videos measuring 235 MB, 220 MB, and 207 MB.
This illustrates why checking file size can be more effective than simply looking at the number of files.
A few large videos can use more storage than hundreds of small documents or images.
Google’s Files by Google documentation also provides a dedicated tool for finding large files that can be reviewed and removed when they are no longer needed.
Do not delete large files automatically
A large file is not necessarily an unnecessary file.
Before removing one, ask:
Do I still need it?
Is there another copy?
Is it backed up?
Will I need it later?
For example, a 448 MB video may be an excellent candidate for removal if it is an old duplicate, but it should stay on the phone if it contains something important and exists nowhere else.
Step 3: Review Duplicate Files
Duplicate files are another area worth checking.
Return to your storage management screen and select Duplicate files.
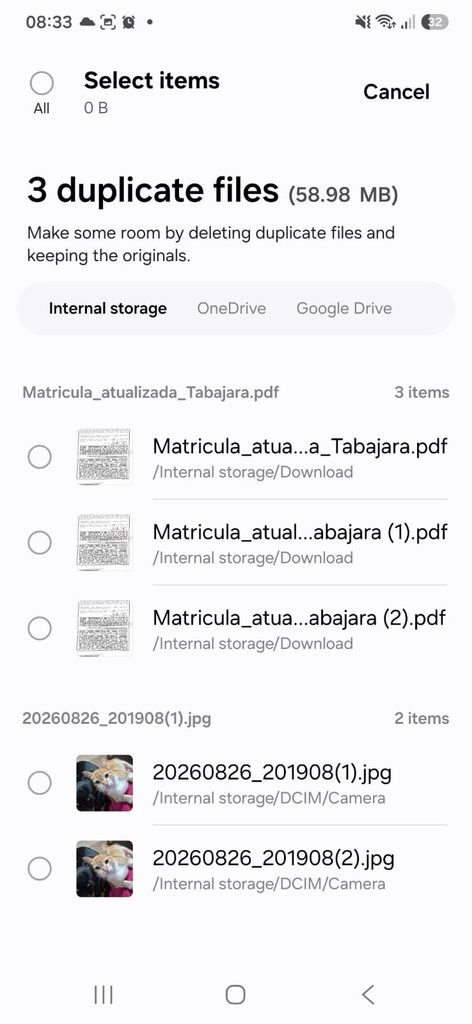
Image 3 caption:
Samsung Galaxy storage manager identifying three duplicate files using 58.98 MB of storage.
Suggested image alt text:Samsung Galaxy duplicate files screen showing repeated PDF and image files
The example device identified three duplicate files occupying 58.98 MB.
One PDF appears three times, while another image appears twice.
This may not recover a huge amount of storage in this particular example, but duplicate-file cleanup can become more useful on phones that have accumulated years of downloaded documents, shared images, and repeated copies.
Google’s Files by Google guidance recommends keeping the file marked as the original when reviewing duplicates.
Be careful with duplicates
Do not assume that two files with similar names are always safe to delete.
Check:
- File name
- File location
- File type
- Date
- Whether the files actually contain the same information
When the device identifies duplicates, review them before confirming deletion.
Step 4: Check Which Apps Are Using the Most Storage
Applications can also consume a significant amount of storage.
Open your phone’s Apps section and sort or review applications by storage usage when your device provides that option.
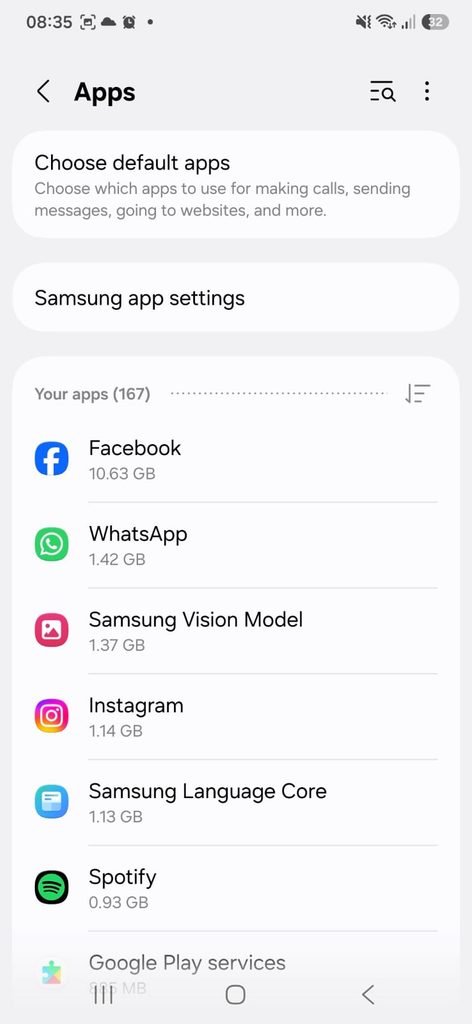
Image 4 caption:
Samsung Galaxy Apps screen showing applications ranked by their storage usage.
Suggested image alt text:Samsung Galaxy apps screen showing applications and storage usage
The example phone has 167 installed apps.
Several applications are using more than 1 GB:
- Facebook — 10.63 GB
- WhatsApp — 1.42 GB
- Samsung Vision Model — 1.37 GB
- Instagram — 1.14 GB
- Samsung Language Core — 1.13 GB
- Spotify — 889 MB
This is a useful reminder that the application taking up the most storage is not necessarily the one you should delete.
For example, if you use an application every day, removing it simply because it is large may not make sense.
Instead, look for apps that you installed for a temporary purpose or have not used for a long time.
Google recommends uninstalling apps that are no longer used as one way to recover storage.
Step 5: Uninstall Apps You No Longer Use
Once you identify unused applications, decide which ones can safely be removed.
Good candidates might include:
- Apps installed for a one-time task
- Games you no longer play
- Old editing apps
- Apps that duplicate functionality you already have
- Services you stopped using
Before uninstalling an app, check whether it contains information that is stored locally.
Some apps keep important notes, downloaded files, drafts, or other data on the device.
Google notes that an uninstalled app can generally be downloaded again later if it remains available on Google Play.
Step 6: Clear App Cache Carefully
Another option is clearing an application’s cache.
Android distinguishes between clearing cache and clearing storage/data.
Clearing cache
Cache consists of temporary data. Clearing it can recover some space without deleting the entire application’s stored data.
Google notes that clearing an app’s cache deletes temporary data, although the app may take a little longer to open the next time.
Clearing storage or data
This is different.
Clearing an app’s storage permanently deletes that app’s stored data, according to Google’s Android guidance.
For that reason, do not tap Clear storage simply because you want to free a little space.
If you are unsure what an app stores locally, investigate first.
Step 7: Review Your Downloads Folder
The Downloads folder is an easy place to find files that were useful temporarily but are no longer needed.
Look for things such as:
- Old PDFs
- Images downloaded for one-time use
- Installation files
- Documents you already saved elsewhere
- Repeated downloads
Review the files individually rather than deleting the entire folder.
Google specifically recommends removing downloaded files that are no longer needed to recover storage.
Step 8: Review Photos and Videos
Photos and videos can become the largest category on an Android phone, especially if you frequently record high-resolution video.
Your first step should be determining whether the files have been backed up.
If you use Google Photos and your important photos have been successfully backed up, Google provides an option for removing copies stored locally on the device. The backed-up versions can still be accessed through Google Photos when the device is connected to the internet.
Do not assume that a photo is backed up simply because Google Photos is installed.
Before deleting important images, verify that the backup has completed.
Step 9: Remove Offline Media You No Longer Need
Music, videos, podcasts, maps, and other offline content can also consume storage.
Check applications that allow you to download content for offline use.
For example, an old collection of downloaded videos can remain on a phone long after you stop watching it.
Google recommends managing downloaded media through the application that originally downloaded it.
This is often safer than manually deleting unfamiliar files from folders.
Step 10: Move Important Files to a Computer
You do not always have to delete files to free up phone storage.
Another option is moving files to another storage location.
For example, you can connect many Android phones to a computer with a USB cable and copy photos, videos, or documents before removing the originals from the phone.
Google specifically lists copying files to a computer as an option for freeing Android storage.
After transferring important files, open several of them on the computer to verify that the transfer worked correctly.
Only then consider removing the copies from your phone.
Step 11: Use Files by Google for Additional Cleanup
If you have Files by Google, it can provide additional suggestions for storage cleanup.
The app can help identify things such as:
- Temporary files
- Duplicate files
- Large files
- Files recommended for removal
- Unused apps
- Screenshots
Google documents several of these cleanup features in its Files by Google help center.
When using cleanup suggestions, review the proposed files before confirming deletion.
Google warns that removing unnecessary files through Files by Google can be permanent.
What You Should Not Delete Just to Free Space
Storage cleanup becomes risky when you start deleting files simply because you do not recognize their names.
Be especially careful with:
- System files
- Application data
- Files whose purpose you do not understand
- Important documents
- Photos that have not been backed up
- Files belonging to applications you actively use
The distinction between cache and app storage is particularly important. Clearing cache removes temporary data, while clearing app storage can permanently remove the application’s data.
When in doubt, leave the file alone until you know exactly what it does.
How Much Storage Should You Try to Free?
There is no universal number that every Android user needs to reach.
Instead of trying to achieve a particular percentage, look at the way your phone behaves and how much free space you regularly need for photos, videos, app updates, and other files.
Google notes that smartphones can begin experiencing problems when less than 10% of storage remains available.
That means you should avoid waiting until the storage is completely full before cleaning it.
A Simple Monthly Storage Check
You do not need to perform a major cleanup every week.
A simple routine can help:
Once a month
Review your Downloads folder.
Every few months
Check large files and duplicate files.
Occasionally
Review applications you no longer use.
Before replacing your phone
Make sure important photos, documents, and other files have been backed up or transferred.
This is easier and safer than trying to recover several gigabytes of storage in an emergency.
Frequently Asked Questions
How can I free up Android storage without deleting photos?
Start by checking large files, duplicate files, downloads, unused applications, and offline media. You can also move important files to a computer. If your photos are properly backed up, Google Photos may allow you to remove local copies from the device.
Does clearing cache delete my photos?
Clearing an app’s cache removes temporary data belonging to that app. It is different from deleting photos from your gallery. However, the exact storage options can vary between devices.
Is it safe to delete duplicate files?
It can be safe when you have confirmed that the files are genuine duplicates and that one correct copy remains. Files by Google specifically recommends keeping the file marked as the original.
Why is one Android app using several gigabytes?
An application’s storage footprint can include the app itself as well as locally stored data and cached content. Large amounts of downloaded media or accumulated app data can make some applications much larger than expected.
Should I delete an app that uses a lot of storage?
Not necessarily. Size alone does not mean an app should be removed. Consider whether you use it, whether its data is important, and whether you could reinstall it later.
Should I use a third-party phone cleaner?
You do not necessarily need one. Android provides its own storage-management tools, while Files by Google offers additional options for identifying large, duplicate, unnecessary, and other removable files.
Final Storage Check
After reviewing the largest categories, return to your phone’s storage screen and see how much space you recovered.
The most effective approach is usually to work from the largest sources first:
Large videos → unused apps → downloads → duplicate files → unnecessary temporary data
That approach is more controlled than randomly deleting files.
The example used in this guide shows why checking the storage overview first is useful: the phone revealed that images occupied 24.20 GB, large files accounted for 4.41 GB, and duplicate files represented 58.98 MB. Looking at those figures makes it easier to decide where to investigate before deleting anything.
Most importantly, remember that the goal is not to empty your phone. The goal is to remove data you no longer need while protecting the files you do.