

Large files can be difficult to send by email, upload to a website, or share with another person.
A video, collection of photos, PDF document, or ZIP archive can quickly become too large for a service’s attachment or upload limit. When that happens, compressing the file can make it easier to share.
Compression does not always produce the same result. Some files can become significantly smaller, while others may change very little. The best method depends on the type of file you are working with.
The important thing is to reduce the size without accidentally damaging important information or creating unnecessary copies.
Why File Size Matters
Many online services place limits on the size of files you can upload or attach.
For example, you may have a document that is perfectly usable on your computer but too large to send through an email service.
Large files can also take longer to upload and download, especially on slower internet connections.
Compressing the file can make the transfer more convenient.
Check the File Size First
Before compressing anything, check how large the file actually is.
In Windows File Explorer, right-click the file and select Properties.
You can see its size along with other information.
This gives you a useful starting point.
For example, if a PDF is 8 MB and the website allows files up to 10 MB, there may be no reason to compress it at all.
On the other hand, a 40 MB document may need to be reduced significantly before it can be uploaded.
Different File Types Behave Differently
One of the most important things to understand is that compression does not work equally well with every file.
A text-heavy document may shrink substantially.
A folder containing uncompressed images can also become smaller.
However, many modern photos, videos, and audio files are already compressed.
Trying to compress them again may produce only a small reduction.
This is why you should choose your compression method based on the type of file.
Compress Several Files Into a ZIP Archive
When the main goal is to send several files together, creating a ZIP archive is often the simplest solution.
For example, instead of sending:
Photo1.jpg
Photo2.jpg
Photo3.jpg
Document.pdf
you can create:
Project_Files.zip
This puts everything into one package.
A ZIP file may also reduce the total size, although the reduction depends on the contents.
Files such as some documents and uncompressed data may compress well.
Already-compressed files, such as many JPG images and MP4 videos, may barely change in size.
Create a ZIP File on Windows
Windows includes built-in support for creating ZIP archives.
Select the files you want to combine in File Explorer.
Right-click the selected files and choose the ZIP compression option available in your version of Windows.
Windows will create the archive, which you can then rename.
For example:
Documents_For_Review.zip
This method is especially useful when you want to organize several files into one package.
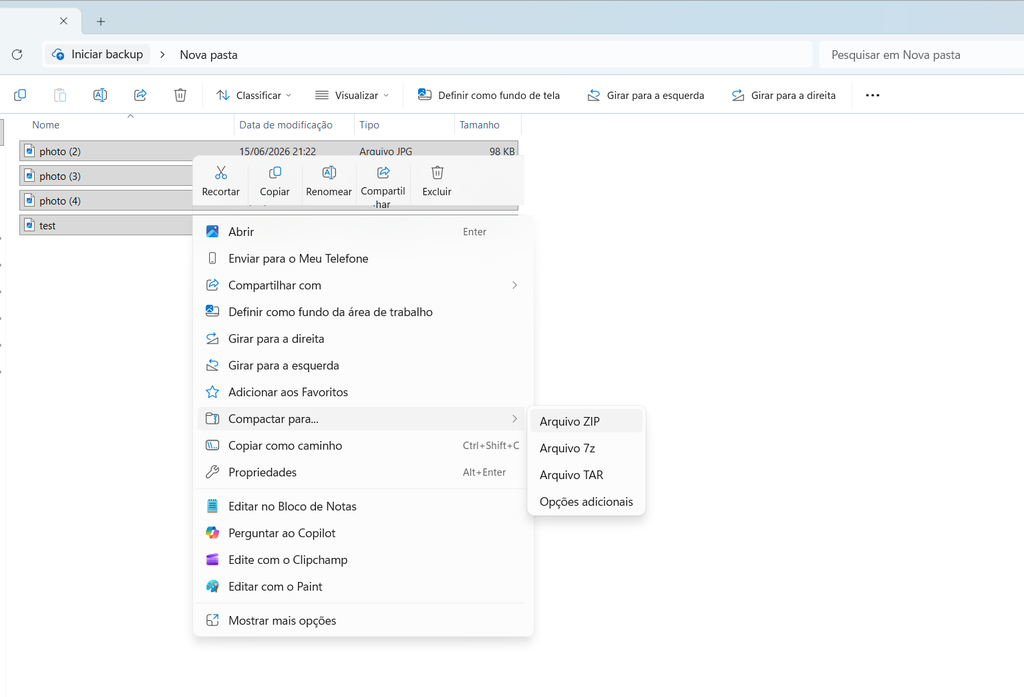
A Windows File Explorer window showing several selected files being prepared for compression into a ZIP archive.
Compress Images Before Sharing Them
Photos can become very large, especially when they are taken with modern smartphones at high resolution.
If you need to send several images, reducing their dimensions or quality can sometimes produce a much larger size reduction than simply putting them into a ZIP file.
For example, a high-resolution photo may be much larger than necessary for a simple email attachment.
If the recipient only needs to view the photo on a screen, sending it at an extremely high resolution may not be necessary.
However, keep the original image if you may need the full quality later.
Do Not Overcompress Important Photos
Compression can reduce image quality.
This may not matter when sending a casual photo to a friend, but it can be a problem with:
- Scanned documents
- Product photos
- Work images
- Designs
- Photos intended for printing
Before reducing image quality, consider how the recipient will use the file.
A small file is not automatically a better file.
Reduce PDF Size When Necessary
PDF files can also become surprisingly large.
This is especially common with scanned documents and PDFs containing many high-resolution images.
If a website has a strict upload limit, you may need to compress the PDF.
When using a PDF compression tool, check the result afterward to make sure the text remains readable.
A heavily compressed document may become difficult to read if too much quality is removed.
Be Careful With Online Compression Tools
There are many websites that offer free file compression.
They can be useful, especially when you do not have suitable software installed.
However, you should think carefully before uploading sensitive documents.
A file containing personal information, financial records, identification documents, contracts, or private work information should not be uploaded to an unfamiliar website simply to reduce its size.
For sensitive files, a trusted application on your own device may be a better choice.
Check Whether the Compression Actually Helped
After compressing a file, compare the new size with the original.
For example:
Original: 25 MB
Compressed: 8 MB
In this case, the reduction is significant.
But if the result is:
Original: 25 MB
Compressed: 23 MB
the compression may not have been worth the effort.
This is particularly common with files that were already compressed.
Keep the Original File
Do not immediately delete the original after creating a smaller version.
The compressed copy may not have the same quality or contents you need later.
Keep the original until you know that the compressed version works correctly and is suitable for its intended use.
For important files, keeping the original is especially useful.
Rename the Compressed Version Clearly
If you create a new compressed copy, give it a name that makes the difference obvious.
For example:
Presentation_Original.pptx
and:
Presentation_Compressed.pdf
or:
Photos_For_Email.zip
This can help prevent you from accidentally sending the wrong version.
Check the Compressed File Before Sending It
Never send a compressed file without checking it first.
For a ZIP archive, open it and verify the contents.
For a compressed PDF, open the file and make sure every page is readable.
For a resized image, zoom in and inspect important details.
A few seconds of checking can prevent an embarrassing mistake.
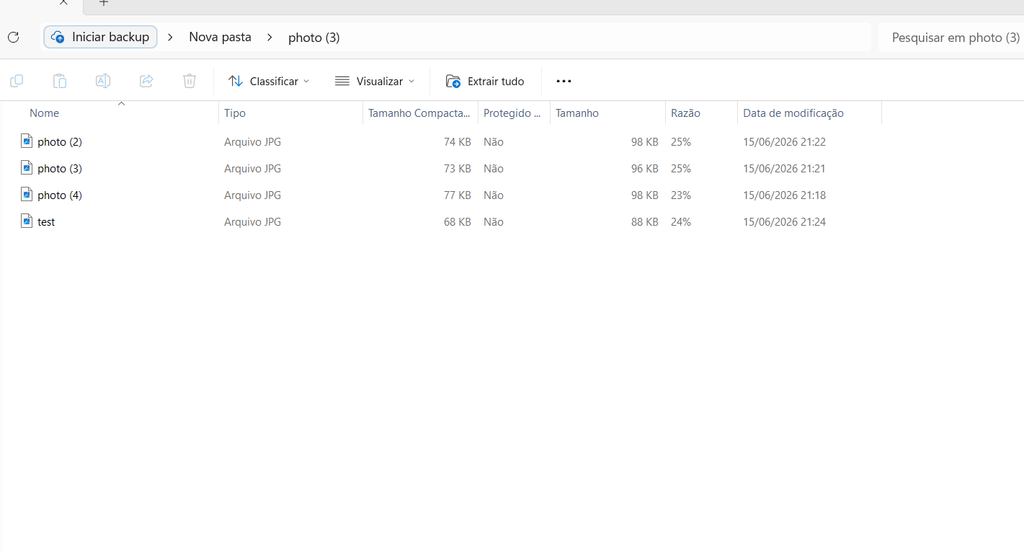
A compressed file opened on a computer and checked before being shared with another person.
Make Sure Nothing Important Was Removed
Some compression methods can remove information or reduce quality.
When working with documents, review the final file carefully.
Check that:
All pages are present.
Images still look correct.
Text is readable.
The correct file was compressed.
No important information was accidentally removed.
If the compressed file is going to be used for an official submission, application, or work project, this check is particularly important.
Compress Files Before Uploading Them
Websites sometimes impose strict file-size limits.
For example, an application portal may accept files only below a certain size.
Instead of discovering the limit after spending time preparing the document, check the requirement first.
Then choose the appropriate compression method.
The goal is to get the file small enough to meet the limit while keeping the quality required for the task.
Consider Splitting a Large File
Compression is not always the best solution.
Sometimes a file cannot be reduced enough without sacrificing too much quality.
In that case, splitting the information into smaller files may be more practical.
For example, instead of one enormous collection of documents, you could create:
Application_Part1.pdf
Application_Part2.pdf
However, only use this approach when the recipient or website allows multiple files.
Large Videos May Need a Different Approach
Videos can be difficult to compress significantly using ordinary ZIP files.
If you need to reduce a video’s size, the more appropriate approach is usually to export it at a lower resolution or bitrate.
For example, a video intended only for phone viewing may not need the same resolution as a video intended for a large screen.
Always keep the original video before creating a smaller copy.
This gives you the option to produce another version later.
Check the Recipient’s Requirements
Before compressing a file, find out what the recipient actually needs.
They may specify:
A maximum file size.
A required format.
A minimum image quality.
A specific number of files.
A specific page size.
Reducing the file too aggressively can create a new problem if the resulting document no longer meets the requirements.
Do Not Change File Types Just to Reduce Size
Changing a file from one format to another is not always the same as compressing it.
For example, converting a document into a completely different file type can affect how it works or how easily someone else can open it.
Use a format that is appropriate for the recipient.
When possible, reduce the size while keeping the original format.
Organize Your Compressed Files
If you regularly create smaller copies for sharing, do not leave them mixed together with your originals.
You could create folders such as:
Originals
For Sharing
Compressed
This makes it easier to recognize which version should be kept permanently and which version was created only for a specific transfer.
Delete Temporary Copies Later
After successfully sending a compressed file, you may not need to keep the smaller temporary version forever.
Review your storage periodically and remove temporary copies when they are no longer useful.
However, make sure the original remains safely stored if it is important.
Use Cloud Storage When Appropriate
Sometimes the easiest solution is not compression at all.
If a file is too large to send by email, you may be able to upload it to a trusted cloud storage service and share a link instead.
This can be particularly useful for very large videos or collections of photos.
Before sharing a link, verify the sharing permissions so that the intended recipient can access the file without exposing it to people who should not have access.
A Simple Compression Strategy
When a file is too large to share, start by asking what type of file it is.
For several documents, create a ZIP archive.
For images, consider reducing their dimensions or quality.
For PDFs, use a trusted PDF compression method.
For videos, consider exporting a smaller version.
Then compare the file size and check the result.
This approach is much more effective than applying the same compression method to everything.
What Not to Do
Avoid repeatedly compressing and reconverting the same file.
Every additional conversion can potentially reduce quality, especially with images and videos.
Also avoid deleting your original file immediately.
And do not upload sensitive documents to random websites just because they advertise free compression.
Convenience should not come at the expense of your data or file quality.
A Quick Checklist Before Sending a Large File
Before sharing a compressed file, ask:
Is the file small enough for the destination?
Is the file still readable or viewable?
Did I keep the original?
Does the file contain only what I intended to share?
Did I use a suitable compression method?
If the answers are yes, the file should be ready to send.
Compressing files is useful when you understand what compression can and cannot do.
ZIP archives are excellent for grouping files and may reduce the size of some types of data. Images, PDFs, and videos may require different approaches when size reduction is the main goal.
The safest strategy is to keep the original, choose the right compression method, and always check the smaller file before sending it.