
Distressed denim has remained one of the most consistent trends in casual fashion for decades, but its meaning has evolved significantly over time. What was once associated primarily with rebellious subcultures has now become a mainstream aesthetic embraced by luxury brands, independent designers, and everyday consumers alike. Across Canada, distressed denim is especially popular because it blends comfort, durability, and personal expression in a way that few other materials can match. Shorts and jackets, in particular, offer ideal surfaces for customization because they are visible statement pieces that can transform an entire outfit with minimal effort.
Many people assume that distressing denim requires professional tools or factory-level processes, especially when comparing DIY results to retail pieces sold at high prices. In reality, most distressed denim techniques can be performed safely at home using simple tools, as long as the process is approached with patience, planning, and a clear understanding of fabric behavior. The difference between amateur-looking damage and stylish distressing often comes down to restraint, placement, and technique rather than expensive equipment.
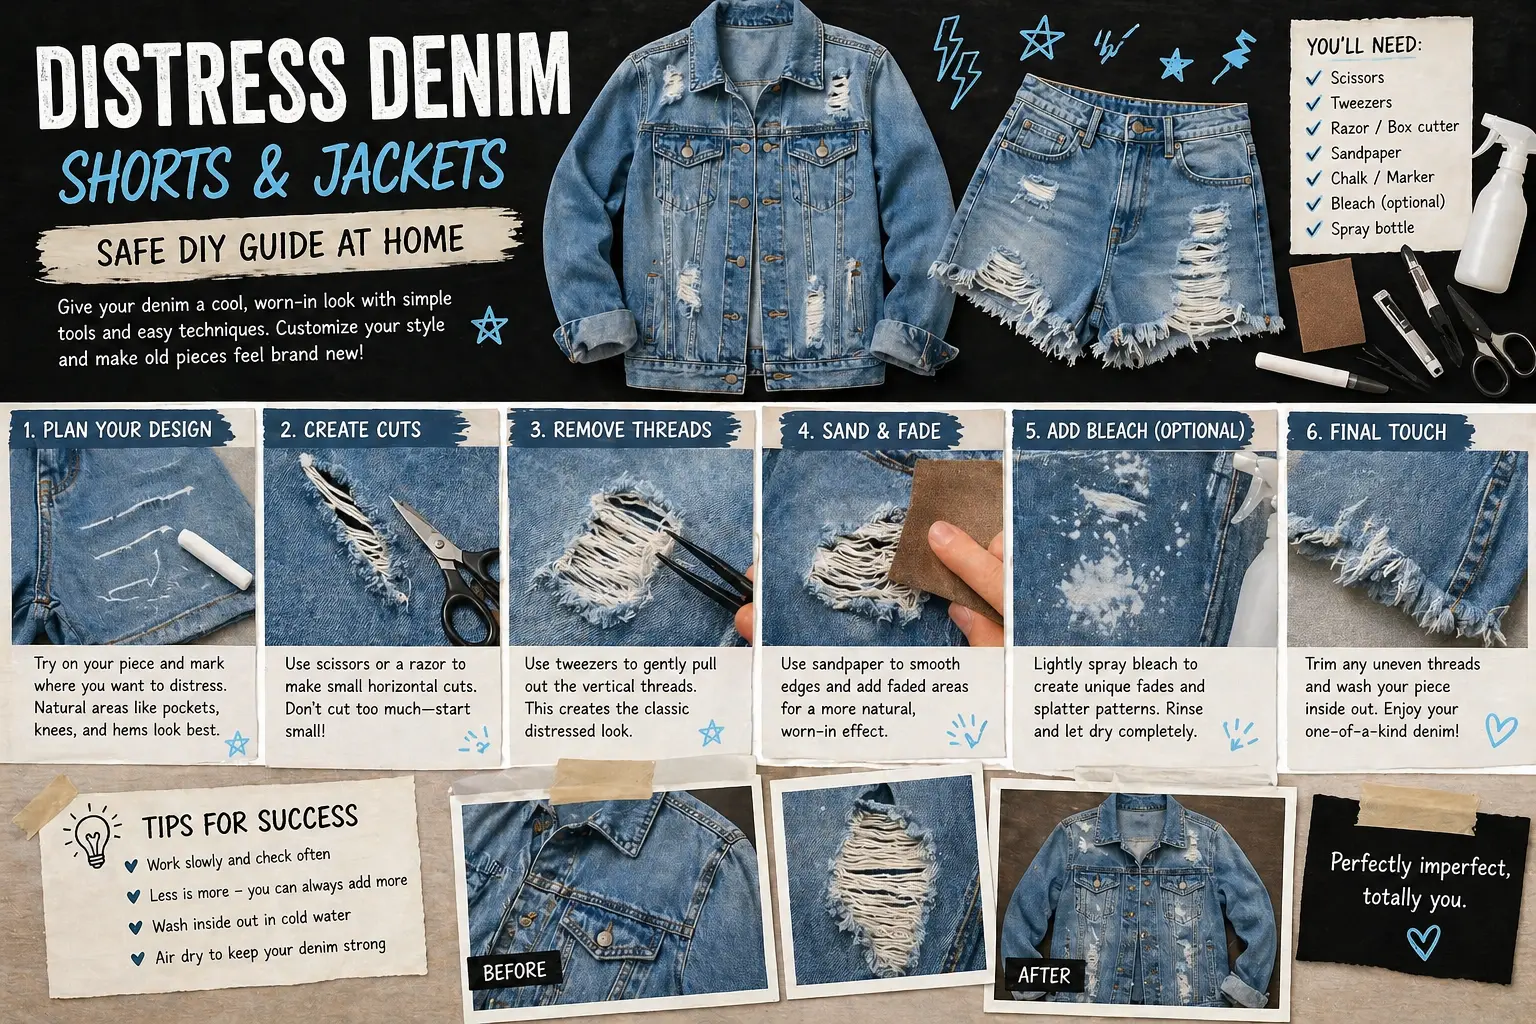
This guide explores how to distress denim shorts and jackets safely at home while maintaining garment durability, avoiding common mistakes, and achieving results that look intentional rather than accidental. Whether your goal is to modernize old clothing, experiment with DIY fashion, or build a foundation for a small customization business, understanding how to distress denim properly is an essential skill.
Why Denim Is Ideal for Distressing
Denim is uniquely suited for distressing because of its woven structure. Unlike many fabrics that tear unpredictably or lose integrity quickly, denim contains strong vertical and horizontal threads that allow controlled manipulation. When distressed correctly, the outer indigo-dyed threads wear away while the inner white threads remain intact, creating the signature textured look associated with distressed jeans, jackets, and shorts.
Older denim garments often perform even better than newer ones because they have already softened through repeated washing and use. Vintage denim jackets and worn jeans frequently produce more natural distressing effects compared to stiff, newly manufactured pieces. This is one reason thrift stores across Canada have become popular sourcing locations for DIY fashion enthusiasts. Instead of buying expensive pre-distressed clothing, many people prefer to start with older denim and customize it themselves.
Another advantage of denim is its versatility. Shorts, jackets, jeans, and even skirts can be distressed using similar techniques. This allows beginners to experiment with different garments while building confidence in their skills. Because denim is relatively forgiving, minor mistakes can often be incorporated into the overall design rather than completely ruining the piece.
Choosing the Right Denim Garment
Not all denim behaves the same way, and choosing the right starting piece plays a significant role in the final result. Thick, high-quality denim generally produces the best distressing because it allows more control during the process. Lightweight or overly stretchy denim may tear too easily, making it difficult to achieve clean, intentional effects.
When selecting denim shorts, consider length and fit. Loose-fitting shorts tend to provide more flexibility for distressing, while tighter cuts require more careful placement to avoid weakening stress points. Jackets offer larger surface areas, especially on the back panel, sleeves, and pockets, which makes them ideal for more creative or artistic distressing patterns.
Color also matters. Dark indigo denim produces high contrast when distressed because the white inner threads become more visible. Light-wash denim creates subtler effects that may appear more vintage or worn-in rather than aggressively distressed.
Many beginners source affordable denim from retailers like Walmart or purchase second-hand pieces from local thrift stores. Starting with inexpensive garments reduces pressure and allows more freedom to experiment.
Essential Tools for Safe Distressing
One of the most appealing aspects of denim distressing is that it does not require specialized equipment. Most tools needed for effective results are already available in many households or can be purchased inexpensively. Items such as scissors, tweezers, razors, and sandpaper form the foundation of most distressing techniques. Each tool serves a specific purpose, and understanding how to use them correctly improves both safety and results.
Scissors are typically used to create initial cuts, especially when forming rips or distressed openings. Tweezers allow for precise removal of vertical threads, which helps create the classic frayed look without completely destroying the fabric. Sandpaper can soften edges and simulate natural wear, while razors help refine distressed areas and add subtle fading.
Safety should always remain a priority when working with sharp tools. Cutting away from your body, working on stable surfaces, and taking breaks when needed reduces the risk of injury. Many beginners rush through distressing projects, which often leads to uneven results and unnecessary accidents.
Planning Distressing Placement
One of the biggest differences between professional-looking distressed denim and poorly executed DIY projects is placement. Random cuts and excessive tearing often create garments that look damaged rather than stylish. Intentional distressing, on the other hand, mimics natural wear patterns that occur over time.
Areas that commonly experience wear include knees, thighs, pocket edges, and hems. When distressing shorts, focusing on the front thigh area and bottom hem often produces balanced results. For jackets, elbows, cuffs, and back panels offer opportunities for both subtle and more dramatic effects.
Trying the garment on before starting helps visualize where distressing will appear when worn. Marking areas lightly with chalk allows for better planning and reduces the likelihood of mistakes. Taking time during this stage significantly improves the final outcome.
Creating Distressed Effects Step by Step
Distressing begins with small, controlled actions rather than aggressive cuts. Starting slowly allows for adjustments and prevents irreversible damage. When creating rips, making small horizontal cuts provides a foundation for further refinement. Using tweezers to remove vertical threads exposes the horizontal white fibers that define distressed denim.
Layering techniques creates more realistic textures. Instead of focusing on one large distressed area, spreading smaller details across different parts of the garment often produces more balanced results. Sandpaper can be used to fade surrounding areas, blending distressed sections into the rest of the fabric.
For jackets, combining light sanding with selective tearing creates depth and dimension. For shorts, frayed hems often add a relaxed, casual appearance that works well for everyday wear.
Using Bleach for Additional Effects
Bleach can enhance distressed denim by creating faded patterns and color variations. When used carefully, it adds depth and contrast to distressed areas. However, bleach should be applied with caution because excessive use can weaken fabric fibers and reduce durability.
Applying small amounts with spray bottles or brushes allows for more control. Creating gradients or subtle splatter effects often produces more natural-looking results compared to fully saturating large areas. Proper ventilation is essential, especially when working indoors during colder months in Canada.
After applying bleach, garments should be rinsed thoroughly to stop the chemical reaction. Allowing bleach to sit too long may cause unintended damage.
Maintaining Structural Integrity
One of the most overlooked aspects of distressing is maintaining the strength of the garment. Excessive tearing in high-stress areas, such as seams or waistlines, can cause clothing to fall apart after minimal use. Understanding where fabric needs to remain strong helps prevent this issue.
Reinforcing certain areas, even in no-sew projects, can be done by avoiding excessive cuts near seams. Strategic placement ensures that the garment remains wearable over time. Distressed denim should look worn but still function as reliable clothing.
Common Mistakes Beginners Make
Beginners often make the mistake of over-distressing their garments. Too many cuts, excessive bleach, and aggressive sanding can quickly turn a project into something unusable. Another common issue is lack of planning, where distressing is applied randomly without considering how the garment will look when worn.
Impatience also plays a role. Rushing through the process reduces control and increases the likelihood of mistakes. Taking a gradual approach allows for adjustments and better overall results.
Caring for Distressed Denim
Proper care helps maintain distressed denim over time. Washing garments inside out reduces friction on distressed areas. Using cold water and gentle cycles preserves fabric integrity. Avoiding high heat in dryers prevents further weakening of fibers.
Distressed denim naturally evolves with wear, which is part of its appeal. However, proper maintenance ensures that it ages gradually rather than deteriorating quickly.
Final Thoughts
Distressing denim shorts and jackets at home is a highly accessible way to create personalized fashion without relying on expensive retail options. With simple tools, thoughtful planning, and a focus on subtlety, anyone can achieve professional-looking results from their own home.
The key to successful distressing lies in balance. Too little may go unnoticed, while too much can ruin the garment. Finding that balance takes practice, but it also allows each piece to reflect individual style.
For many people across Canada, DIY denim customization has become more than just a hobby. It represents a shift toward creativity, sustainability, and personal expression in everyday fashion.